Showing posts with label My Renovation. Show all posts

Wednesday, July 14, 2010

Work In Progress: The Hallway

For another short update, we have been working on our hallway. Our hallway is a bit of an issue. The baseboards are hideous. The floors are original and in bad shape. I could go on and on. Anyway, a few months ago Chris and I converted this small ridiculous closet (you couldn't even hang a hanger) into a bookshelf. It never really looked the way we wanted it to and I thought a good way to soften the edges would be to hang a curtain around the bookshelf. I saw it in Domino and It has softened the bookshelf.


I also added the storage buckets. One is full of dog toys and the other full of glossy design mags. We also have been working on painting the interior doors black as you can see in the first photo. That is definitely a work in progress because each door takes at least two if not three coats but I am almost done.

I will back with a full update in a few weeks hopefully. We are working on a gallery wall and I am on the hunt for a fabulous mirror to hang in the hallway.

This is the before shot of the hallway...


Tuesday, July 13, 2010

A Change In Color and Not Much Else: The Living Room


That being said, I plan on replacing almost every piece of furniture in this room. As of right now, the living room is pretty far down the list mainly because every other room only has a few small projects left. Anyway, here is the progress and the plan...

The Mantel Redo. I hung an antique mirror along with an orchid and candlesticks. I do need to invest in a new fireplace screen and I plan on placing two stools in front of the fireplace. (see below).


We painted the room Sharkey Gray by Martha Stewart. It's a great color. We also rearranged the living room and floated the couch. This changed the room a lot and we want to add a console behind the couch to make it feel more like an entryway since you walk right into our living room.

Here the shot from the door. Ignore the golf that is on. Golf is reality in my family. Notice the pillow that I won from Small and Chic in C'Ville.


Another shot from the door...

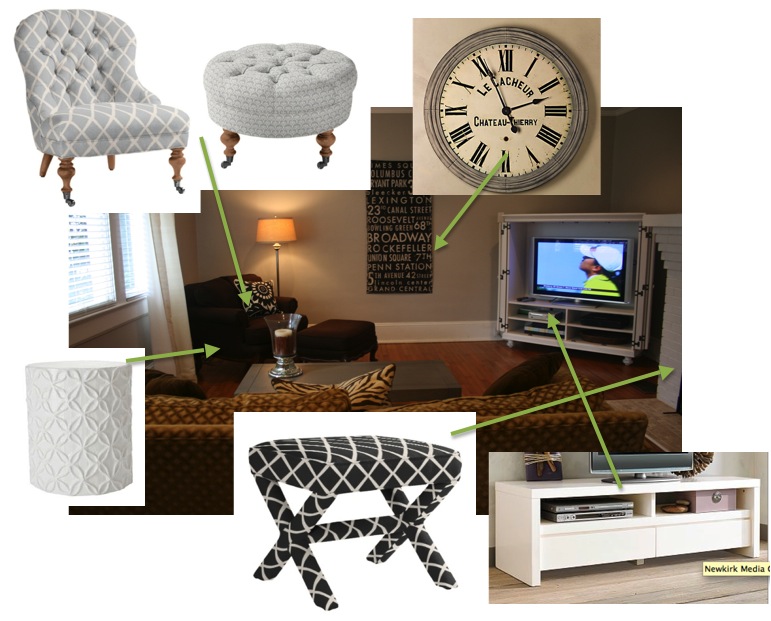
And THE PLAN...

Here is the plan...

1. New Sectional in a Neutral Color
2. Replace Media Cabinet with White TV Stand
3. Move Subway Poster to another wall and add Clock from RH
3. Replace brown chair and ottoman with gray chair and ottoman from Serena & Lily
4. Small table next to new chair
5. Add two black stools in front of mantle.
6. Desperately need a rug
7. Replace shade on floor lamp.

Hopefully the rest of the house will finish quickly so we can get cracking on the living room.

Monday, July 12, 2010

We're Getting There: My Dining Room


Ever since we took our house off the market, I have been working on my dining room. If you haven't been following my blog for very long I will give you the history.


When we moved in our dining room was school bus yellow. I then painted it brown (see bottom of post) and then I tried to paint it dove gray, which turned out to be baby blue. Now I have painted it for the third time to Sharkey Gray by MS Paints and I love it. The color is a taupe/gray depending on the light of the room. Here it is...


We added a new light fixture from Pottery Barn. It's pretty although it's a little "Disco Ball-esque" at night.


We originally intended to put up 3-4 floating shelves on the wall but after putting up one we ended up with this. It will be a great bar area when we entertain.


I'm not entirely finished because the dining room chairs are going to be replaced. I am thinking of the Queen Anne Chair from PB and adding some decorative fabric to the seat. I might add a bar cart as well.


It's not finished but we are getting there.


Here's the before shot...

Sunday, May 30, 2010

Casa de Holland

As I have posted earlier, I am in the middle of a dining room redo. I really want this light fixture from Restoration Hardware (although I don't want to pay $500 for it) and I can't find a suitable alternative. At ikea last week I got the idea to hang a paper lantern over my dining room table until I can find a suitable alternative. We hung the lantern yesterday and for $14 dollars I am fairly pleased but I want your opinion.

Lantern or No Lantern?
Love it or hate it?
Would it be better in my office?

Also please excuse the Home Depot bag on the table. Remember that the roman shades are coming down (they were recalled) and will be replaced by brown silk panels like those on the other window.

In other news, since the dining room will hopefully be done in the next few weeks, I am testing out paint colors. This is Martha Stewart Sharkey Gray.


Speaking of colors, this week is all about color. I am picking some of your favorite colors and forming lists of my favorite things.


Have a great holiday!

Monday, May 3, 2010

Dining Room Redo: Phase 1


This weekend Chris and I decided to take our house off of the market. Since we have been chomping at the bit to start working on the house I almost simultaneously started painting my dining room. This room has the simplest to do list so it was my first target.

Here's the before. I always felt the room was too.... brown. It was really boring and I hated how every single thing was brown.


Here's the after (well phase 1 of the "after")
I painted the walls a light gray called Dolphin by Martha Stewart. I hung chocolate silk drapes (because I am obsessed with chocolate silk drapes). We did a bit of rearranging too.

Since this is phase 1, the plan for phase 2 is as follows:

1. Create open shelving on one wall for display
2. Replace that horrible chandelier
3. Replace the Rug
4. Possible dining chair replacement
5. Possible Roman Shade replacement

I am so much happier with the color. The room seriously grew by 3 feet when we changed the wall color. It feels so much bigger.

As for the light fixture, anyone have any ideas where I can get a light fixture like this one? I really want this one but I don't want to pay $500 from Restoration Hardware.

Wednesday, April 14, 2010

Dining Room Reform


After yesterday's post, I have been so excited to plan what I will do to my dining room should our house not sell in the next 60 days. This will be a quick redo because I won't have to buy much since I will probably do some swapping with other rooms in our house. Here's what I'm thinking...

My dining room before. Simple, clean but blah...

I am going to move my brown silk curtains from my living room to my dining room.

I am going to move my dining room rug that I love into my living room. Then I want to add a new rug. I really want something with a pattern but I might opt for something simple and gray. Hopefully I can find something fabulous but these give you the general idea.


I want to take down the chandelier that I don't like at all. I want to add a ceiling medallion (preferably an oblong one) and hang a single pendant light with a white drum shade...
My china cabinet is one of my favorite pieces of furniture in my house. I think I want to switch out the knobs and wallpaper the back...
Have Chris building and install open shelving like these...

Monday, April 5, 2010

Bedroom Redo: Phase 2

I think I have officially stepped into phase 2 of the bedroom redo with the addition of this new mirror I scored at HomeGoods.

I love it. I wanted a full length mirror but I couldn't pass this one up because I loved the frame. The plan is to put a black side chair in front of it with my thomaspaul pillow I won at Small and Chic in C'Ville a few months ago. (sorry for the quality of this picture. still getting used to the new camera)

I am really liking the way the bedroom is coming together. Here are some of my favorite details.
Still on the to do list...

1. Touching up paint
2. Replacing my nightstand with a dresser
3. Swapping out chris' nightstand
4. Replacing euro shams, bedskirt and throw pillow
5. Accessorize!

Monday, March 29, 2010

Bedroom Redo: Phase 1.5


I did a little bit of work this weekend on the bedroom. First, I put the chair that was seen in the photo last week in a consignment sale. Second, I hung prints on the large formerly bare wall.

I bought these hideous frames at Michael's on clearance (silly me didn't take a picture of the original). They were so ugly. After discarding the equally as ugly mattes, I spray painted the frames with white Appliance Epoxy. My stepmother recommended appliance epoxy because it gives a hard enamel super glossy look. I replaced the mattes with simple white ones and voila.

These photos are photos I took in Charleston, SC a few weeks ago. I am very happy with how it turned out and I can't wait to go in search of a full length mirror next weekend!

Tuesday, March 23, 2010

Bedroom Redo: Phase 1

Chris and I (well mainly I) have been wanting to vamp up our bedroom. We didn't spent any time redoing this room since the rest of the house needed so much work. That being said I have decided that move or no move it was time to do some much needed editing and adding to the bedroom.Here's the before and forgive the photos. I am experimenting with the panoramic function on my new camera.


That's Jack and Griffin on our bed.

We have a great bed and nice bedding. The curtains are a little too floral for me. I hate the chair and the armoire that are in there so those are going the way of Craigslist soon.

Here's phase 1....

We moved the bed in front of the windows. Replaced the curtains with silk drapes from Pottery Barn in Ivory. I got a new lamp from HomeGoods ($40!). I think the curtains lighted up the space a lot and I love my new lamp.

I was hoping to get more done but unfortunately allergy attacks interrupted my productivity.

Here's the plan for Phase 2 and beyond....

Get rid of Armoire and Chair (via Craigslist)
New Throw Pillows and Bedskirt
Get rid of Chris' nightstand
Add a small dresser to my side of the bed
Add prints to the bare wall
Add full length mirror somewhere in the room
Recover and add black side chair into the room (it's current yellow and in my guest bedroom)


Wednesday, November 25, 2009

Paint Your Wagon


Painting as been a huge part of our renovation. I honestly could never see a paint brush again and I would be fine with that. Nevertheless I so have some experience painting and here is what we did and what we use in our house.

1. Ralph Lauren Paint. I really like their paint colors. The colors are unique and perfect. They also have subtle differences between shades that can make a world of difference. You can see the paint colors we used above. We used Coastal Beige in the common areas of the house, Hopsack in our bedroom, Orion Gray in our kitchen and Picket Fence White for the trim in Interior Satin. For the walls we used Interior Eggshell, which is the RL equivalent of flat.

2. Shur Line painting tools. They sell large paint pads to use instead of rollers which really cut down on having to do a second coat.

3. FrogTape. I saw this on television and decided to give it a try. Normal painting tape has a lot of bleed through. FrogTape cuts down on that. I do have to say that it doesn't work miracles so if you are working with uneven surfaces (horse hair plaster for instance!) there still will be some bleedthrough but if it's a flat surface this stuff is great.

Those are our painting tips!

Monday, November 16, 2009

Before & After: Master Bathroom


Chris and I are lucky our house even has a Master Bathroom because they aren't common in my neighborhood and especially not in houses as old as ours. Our Master Bath was probably the biggest problem area in the house. The bathtub clearly had been used by the renovators (who we bought the house from) to clean paintbrushes to throw things a
nd it was scratched, stained and covered in drips of paint so needless to say we had to replace the bathtub. Further, they had bought a cheap plastic surround that we ripped out and replaced with white subway tile. The bath fixtures were cheap and unappealing so we replaced
those as well. Here is the fruits of our labor...

The Before...
The bath was a spring green color and everything was cheap and very standard.


The After


We added the train rack and replaced all of the fixtures. We replaced the bathtub and tiled. We decided to leave the bathroom very plain and we haven't put anything on the walls because I wanted it to feel very clean and crisp. I wanted it to have an apothecary feel to it.

The only project we did not complete were glass doors for the tub. My husband very wisely thought that young parents who are having to bathe children are not going to want tub doors so we left them off. We also decided to leave the beadboard which I originally planned to remove and replace with more subway tile. We decided it was a bit too expensive and that since we had no idea what was behind the beadboard not to tempt fate.

All building materials were from Lowes and Home Depot. All fixtures came from Pottery Barn.

Saturday, November 14, 2009

The Big Reveal

There's a before and after forthcoming! Here's a few hints...


Pics from Country Living